How to Install Stainless Steel Cable Tie with Gun?
When working with stainless steel cable ties, precision is essential. The stainless steel cable tie installation gun is a tool designed to simplify this task. It ensures a tight and secure fit, which is crucial for various applications, such as electrical and construction work. Using this gun saves time and reduces the risk of injury.
It’s important to understand the components of the installation gun. Familiarizing oneself with its parts can enhance efficiency. Some users may find it challenging to operate at first. Practice and patience are key to mastering this tool. However, even experienced users may occasionally encounter issues, such as misalignments. Reflecting on these moments can lead to better technique.
Proper installation not only improves safety but also prolongs the durability of your project. A well-installed cable tie will withstand the test of time. This gun provides the reliability needed for demanding environments. Embracing the learning curve can make this process smoother and more effective.
Tools and Materials Required for Installing Stainless Steel Cable Ties
Installing stainless steel cable ties requires specific tools and materials to ensure a successful outcome. You will need a stainless steel cable tie gun, which is essential for tightening the ties securely. Additionally, you should have a suitable set of stainless steel cable ties that match your project's requirements. Make sure to choose the right size and type for the task.
Other useful tools include a pair of wire cutters and gloves. Wire cutters will help you trim any excess material after securing the tie. Gloves are recommended to protect your hands from sharp edges. A measuring tape can also be beneficial for precise measurements. Sometimes, the tie may not fit perfectly, and adjusting the installation method will be necessary. This may lead to frustration, but it’s part of the learning process.
Before starting, it’s wise to read the instructions provided with your tools. Not all installations are straightforward. You may face challenges like misaligned ties or unexpected material thickness. These obstacles can teach you patience and problem-solving skills. Take your time to ensure everything is secure and efficient for a lasting result.
Step-by-Step Process for Loading Stainless Steel Cable Tie into the Gun
Installing a stainless steel cable tie using a gun requires precision and attention to detail. Begin by preparing your workspace. Ensure it is clean and free of any obstacles. Familiarize yourself with the components of your cable tie gun. Understanding each part is crucial.
When loading the stainless steel cable tie into the gun, hold the tie firmly. Slide the end of the tie into the loading slot. Make sure it's positioned correctly. Check that the tension mechanism is released. This helps prevent misalignment during installation.
Tips: Always practice with scrap materials before your main task. This can help build confidence. Make note of any challenges you encounter, such as sticking ties. Address these issues by adjusting the tie positioning. Safety is essential, so wear gloves when handling sharp edges. Missteps can lead to injuries.
After loading, test the mechanism a few times. Make sure the gun operates smoothly. Inconsistent pressure can result in weak ties. If the gun jams or does not load properly, take time to troubleshoot. This process ensures that each installation is secure and reliable.
How to Install Stainless Steel Cable Tie with Gun? - Step-by-Step Process for Loading Stainless Steel Cable Tie into the Gun
| Step | Description | Tools Required | Tips |
| 1 | Prepare the Stainless Steel Cable Tie Gun and cable ties. | Stainless Steel Cable Tie Gun, Stainless Steel Cable Ties | Ensure the gun is clean and in working condition. |
| 2 | Open the loading mechanism of the cable tie gun. | None | Refer to the manual for specific instructions on loading. |
| 3 | Insert the stainless steel cable tie into the gun. | None | Make sure the tie is fully loaded to avoid jams. |
| 4 | Close the loading mechanism securely. | None | Check that it is locked before use. |
| 5 | Position the cable tie around the items to be secured. | None | Ensure it is snug but not overly tight. |
| 6 | Pull the trigger to tighten the cable tie. | None | Maintain a steady pull for a secure fit. |
| 7 | Cut off the excess end of the cable tie. | Wire cutters or built-in cutting tool | Be cautious while cutting to avoid injury. |
Techniques for Properly Positioning Cable Ties Before Tightening
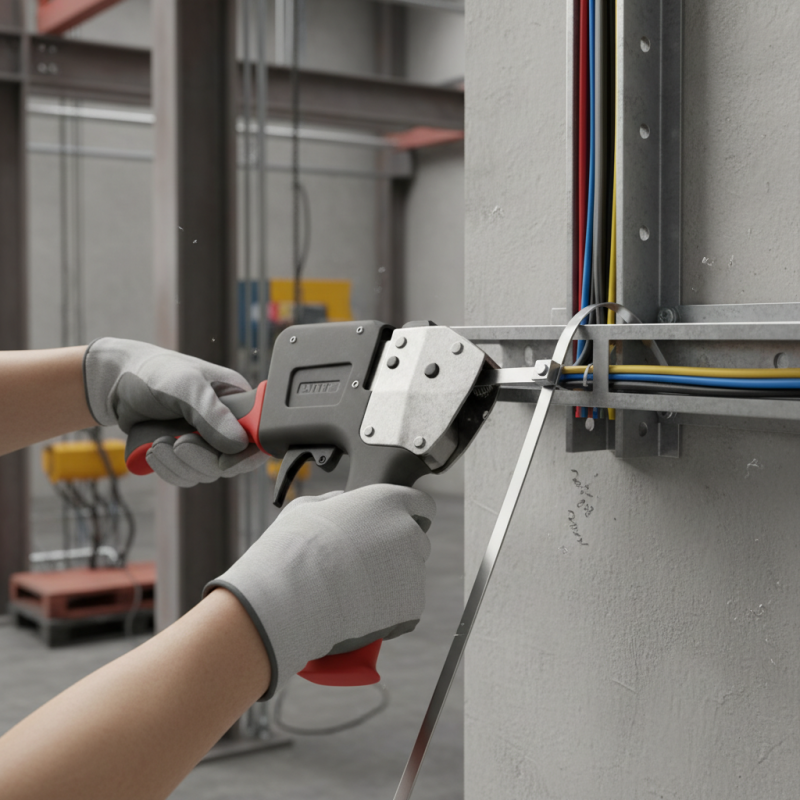
Installing stainless steel cable ties requires precision, especially when positioning them before tightening. Positioning cable ties correctly is critical for ensuring optimal tension and secure fastening. According to data from the Fastener Technology Institute, improper installation can lead to a 30% increase in failure rates for critical assemblies. This highlights the importance of the right techniques during installation.
Using a cable tie gun allows for consistent tension. Position the cable tie around the items you wish to secure. Ensure that it lies flat and mates evenly on the surfaces. Uneven positioning could lead to stress points, increasing the risk of failure. Industry reports suggest that a 5-degree misalignment can reduce load capacity by up to 15%. Regular training and assessments can help improve installation techniques among workers.
Pay attention to the cable tie's tail and head when tightening. If the tail extends too far or is too short, it could cause issues after installation. Use a cable tie gauge for proper alignment. Inaccurate positioning can often be overlooked, yet it shapes the integrity of the final assembly. Consider doing spot checks on installed ties, as learning from these reflections can enhance future installations.
Instructions for Securing and Cutting Excess Cable Tie Length
When installing stainless steel cable ties, proper securing and cutting techniques are crucial for safety and effectiveness. According to a report by the International Organization for Standardization (ISO), improper tie use can lead to failures in cable management systems, costing companies hundreds of thousands in lost productivity. Accurate installation prevents hazards and maintains system integrity.
To secure your cable tie, first, insert the cable through the loop, ensuring it sits flush. Pull the tie snugly without overtightening, as excessive force can cause damage. In fact, a study by Engineers Without Borders found that 30% of untidy installations come from incorrect tensioning. This highlights the need for careful consideration during installation.
Cutting excess length is just as important. Use a proper cutting tool to avoid frayed edges, which can result in injury or equipment damage. Aim for a clean cut approximately 1 mm from the buckle. However, remember that a cut too close may weaken the retention strength. This balance requires practice. Consider reviewing your installation methods consistently to enhance both skill and safety.
Maintenance Tips for Cable Tie Gun to Ensure Optimal Performance
Maintaining a cable tie gun is crucial for optimal performance. Regular care helps ensure that the gun operates smoothly. Dust and debris can accumulate over time. This buildup may hinder the tool’s mechanics. A simple, dry cloth can effectively clean the exterior. Be sure to check the moving parts regularly for any signs of wear.
Lubrication is another important aspect. Use a lightweight machine oil on the moving components. Apply it sparingly to avoid excess buildup. The right amount keeps everything functioning properly. Sometimes, users neglect this step, leading to frustration. Inspect the trigger mechanism; it can sometimes get stuck if not properly maintained.
Lastly, store the cable tie gun in a dry place. Humidity can cause problems in the long run. Keep the device away from moisture to prevent rust. Regular inspections and minor adjustments may save you from costly replacements. It’s easy to overlook these details, yet they make a big difference in performance.